To celebrate Spring, at this video tutorial we create DIY Spring Inspired Jewelry in Collaboration with Helena Daydreamer, a very talented YouTuber. They are very easy to make, look fabulous and match all spring outfits! What’s more is that these DIY jewelry can be made at very low budget, how perfect is that? Make them at home and gift them to people you love. That’s a great mother’s day gift too!
DIY COLORFUL HOOP EARRINGS TUTORIAL:
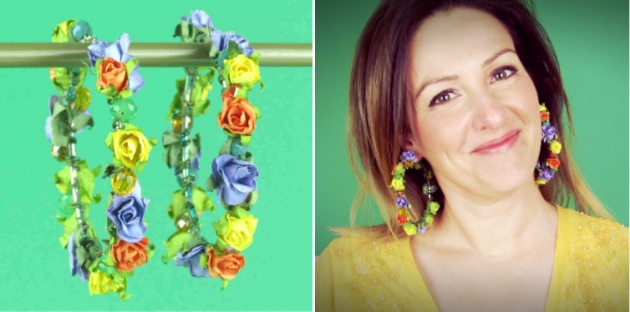
A three-dimensional arrangement of Colorful Paper Flowers which adds a striking look to these hoop earrings! They are elegant, stylish, colorful and so easy to make!
Follow this link to watch how you can make these lovely Earrings step by step: http://bit.ly/2oW0AAl
TO MAKE THE DIY COLORFUL HOOP EARRINGS YOU WILL NEED:
Hoops (time to recycle those old hoops you’re not wearing any more)
Mini Rose Paper Flowers – 10mm (you can find them on eBay)
Beads of your choice (make sure that the hole of your beads is big enough)
Helena Daydreamer created these beautiful and adjustable spring flower earrings that you can see below! To find out how she made them click at her tutorial click here: http://bit.ly/2qlO15a
I guess we all have one piece of jewelry that is our favorite. Is it the special style? The way it makes you feel? The unusual shape or material it’s made of? Whatever it is that makes a piece of jewelry special and unique, I sure know which one is my favorite pair of earrings.
They are made of rubber, they are flexible, and they have a nice movement. Plus, these earrings match most of my outfits and look really good when you have your hair up.
For those of you who share a similar taste, today we are making these earrings at home, it’s super easy and you can make them in any color you like! Scroll down to watch detailed video tutorial!
Φαντάζομαι πώς όλοι έχουμε ένα αγαπημένο κόσμημα! Τι είναι αυτό που το κάνει ξεχωριστό; Μήπως είναι το συγκεκριμένο στυλ; Ο τρόπος που μας κάνει να αισθανόμαστε; Το ασυνήθιστο σχήμα ή το υλικό του; Ότι κι αν είναι αυτό που κάνει ένα κόσμημα ξεχωριστό, ξέρω πολύ καλά ποιο είναι το αγαπημένο μου ζευγάρι σκουλαρίκια. Είναι φτιαγμένα από λάστιχο, είναι ευλύγιστα, και έχουν μια ωραία κίνηση. Επίσης, τα αγαπημένα μου σκουλαρίκια ταιριάζουν σχεδόν με όλα μου τα ρούχα, και φαίνονται πολύ όμορφα με τα μαλλιά πιασμένα επάνω!
Σήμερα φτιάχνουμε μόνες μας στο σπίτι τα αγαπημένα μου κρεμαστά σκουλαρίκια, με έναν πολύ εύκολο τρόπο. Διαλέξτε το αγαπημένο σας χρώμα και πάμε. Παρακάτω θα βρείτε βίντεο με αναλυτικές οδηγίες.
Κάντε κλικ σε αυτό το σύνδεσμο http://bit.ly/2mXxCQi και εκτυπώστε την εικόνα με τα σκουλαρίκια
Step 2 – Βήμα 2
Load the hot glue gun with a glue stick and plug the glue gun’s cord into an electrical outlet. Locate an electric outlet in the wall nearest to where you’ll be working on your project. Wait for 5 minutes for the glue to heat up. Make sure you go over the owner’s manual for information about safely operating your glue gun.
Βάλτε μια ράβδο στο πιστόλι υγρής κόλλας και βάλτε το στην πρίζα για πέντε λεπτά ώστε να ζεσταθεί η κόλλα. Προσέξτε να ακολουθήσετε πιστά τις οδηγίες χρήσης της συσκευής σας.
Step3 – Βήμα 3
Place the earrings print out underneath a baking paper. Lightly squeeze the trigger to release the melted glue and follow the drawing of the earrings with your glue gun. While the glue is still hot place half a toothpick on each earring to create a hole for the earring hooks. Let it dry for 10 minutes.
Βάλτε την εκτύπωση με τα σκουλαρίκια κάτω από την λαδόκολλα. Πιέστε την σκανδάλη του πιστολιού ώστε να αρχίσει να βγαίνει η κόλλα και σχηματίστε πάνω στη λαδόκολλα τα λουλούδια που φαίνονται. Πριν στεγνώσει η κόλλα τοποθετήστε μισή οδοντογλυφίδα σε κάθε σκουλαρίκι, θα χρειαστούμε την τρυπούλα που σχηματίζεται για να περάσει ο κρίκος των σκουλαρικιών. Αφήστε να στεγνώσουν για 10 λεπτά.
Step 4 – Βήμα 4
Remove the toothpicks, use the tweezers to remove any excess glue strings and paint both sides of the earrings with nail polish. Make sure you wait 30 minutes on each side for the nail polish to dry properly.
Αφαιρέστε τις οδοντογλυφίδες, χρησιμοποιήστε το τσιμπιδάκι για να αφαιρέσετε τυχόν υπολείμματα κόλλας πάνω στα σκουλαρίκια και βάψτε και τις δυο πλευρές με βερνίκι νυχιών περιμένοντας 30 λεπτά από την κάθε πλευρά ώστε να στεγνώσουν.
Step 5 – Βήμα 5
Attach a jump ring and a hook to the earrings, and your done!
Βάλτε ένα κρίκο και ένα γάντζο σε κάθε σκουλαρίκι και είστε έτοιμοι!
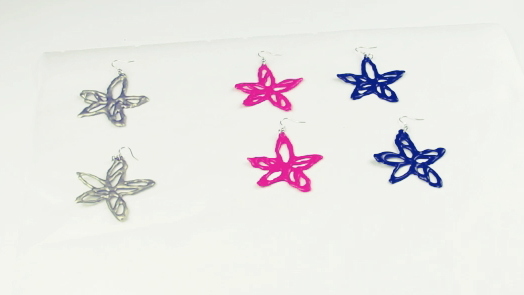
You can use this technique to make any earring shapes you like, for example, you can make hearts, stars, leaves, geometric shapes, just search on google for your favorite drawing, print them out and follow the steps above.
Μπορείτε να χρησιμοποιήσετε αυτή την τεχνική και να φτιάξετε σκουλαρίκια σε ότι σχήμα θέλετε, όπως καρδιές, αστέρια, φύλλα, γεωμετρικά σχήματα. Ψάξτε στο google το σχήμα που σας αρέσει, εκτυπώστε και ακολουθήστε τα παραπάνω βήματα.
If you like you can also apply glitter for a more glamorous look.
Μπορείτε ακόμα να βάλετε και χρυσόσκονη για πιο λαμπερό αποτέλεσμα!
Looking forward to your comments on this project! Tell me what is your favorite piece of jewelry and why?
Θα χαρώ να λάβω τα σχόλια σας για τα αγαπημένα μου σκουλαρίκια! Ποιο είναι το δικό σας αγαπημένο κόσμημα;
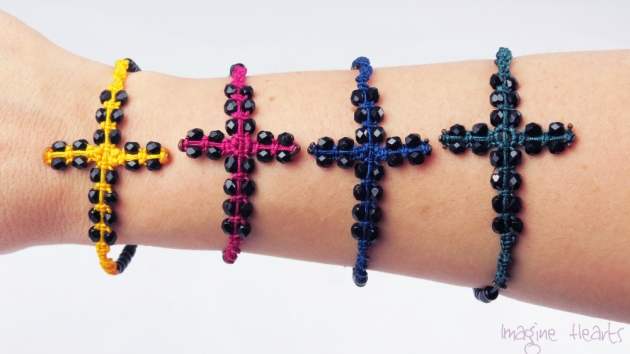
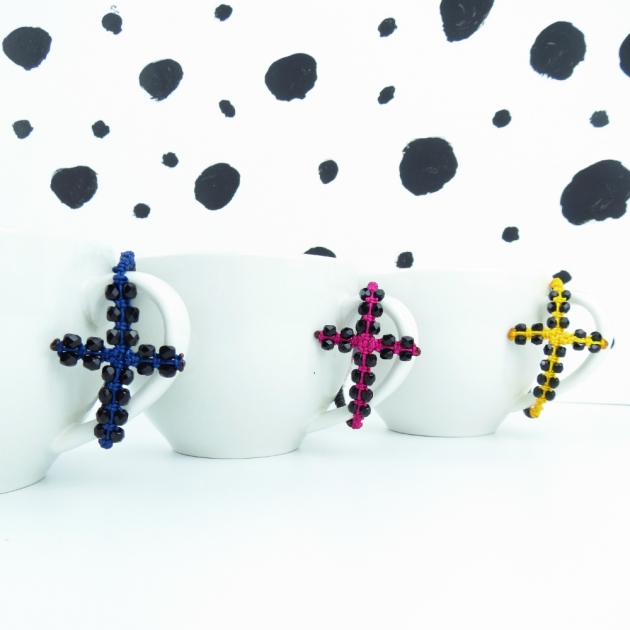
Spring is coming up, let’s bring some bright colors in our lives! At this video tutorial we create a colorful macrame cross bracelet. This stylish bracelet makes a beautiful fashion accessory and a tasteful addition to any outfit.
The funky macrame cross bracelet is made of Czech crystal beads, seed glass beads and macramé knots using nylon synthetic cord. I have made the macrame cross bracelet in several funky colors such as sunshine yellow, orchid fuchsia, basil green, deep sea blue, classic black and each has its own grace. Pick up your favorite color and let’s do this!
Η Άνοιξη πλησιάζει, ας βάλουμε χρώμα στη ζωή μας! Σε αυτό το βίντεο, φτιάχνουμε χρωματιστά βραχιόλια σε σχήμα σταυρό. Τα βραχιόλια αυτά είναι ένα μοδάτο αξεσουάρ που ταιριάζει με κάθε ντύσιμο! Φτιάχνονται από γυάλινες χάντρες Τσεχίας, χαντρούλες ψείρες, και κόμπους μακραμέ με συνθετικό νήμα. Διαλέξτε το αγαπημένο σας χρώμα και πάμε να τα φτιάξουμε. Πατήστε στην παρακάτω εικόνα να δείτε το βίντεο:
22 μαύρες γυάλινες χάντρες τύπου ψείρες – διάμετρος 3,5mm
Σελοτέιπ
Ψαλίδι
Αναπτήρα
Χάρακα
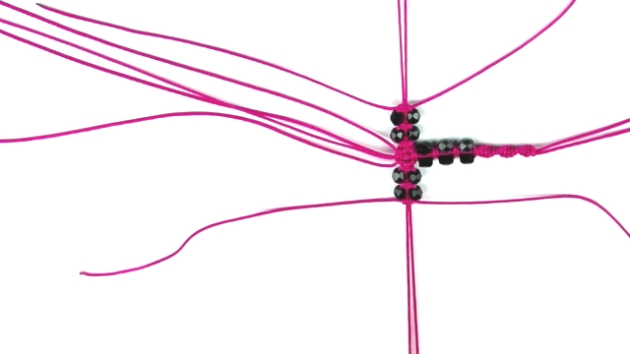
Step 1 :Tie a chain of 12 half-knots to create a spiral effect. Make a square-knot and slide two Czech beads one on each side of the working cord, make another square-knot and add another pair of beads to create the body of the cross.
Step 2. Add four more cords on each side of the bracelet and create the arms of the cross with square knots and Czech beads on each side of your working cord.
Step 3. Trim the excess cords and burn the tips of the cords with a lighter. Continue as in Step 1 to complete the rest of the body of the cross. And then make 12 half-knots to create the spiral effect.
Step 4. Slide 12 seed beads on each side of the bracelet and make an adjustable macrame closure, to fit all wrists.
Hope you’ll enjoy wearing the Funky Macrame Cross Bracelet. Looking forward to your comments below!
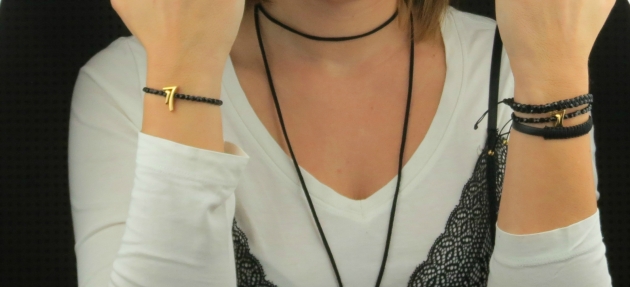
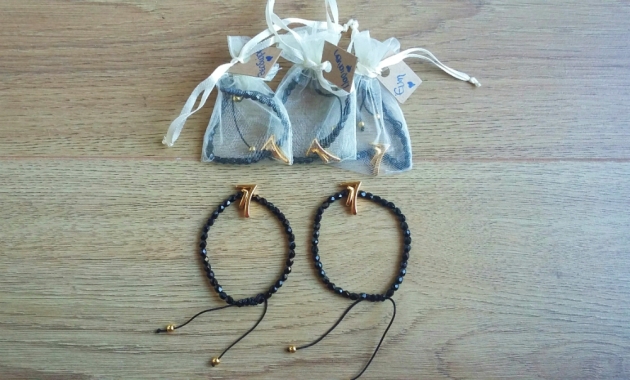
This is an easy to follow video tutorial. Let’s make a beautiful 2017 bracelet that can be worn in all occasions. Make this bracelet to welcome the New Year or make it to wish someone well with a very special gift! We are using the number 1 and 7 to welcome 2017 but it can be used for all years to come just by choosing different numbers! Also it’s a great gift for Birthdays! You can make a birthday bracelet with the years of your friend’s birthday or with the date she was born!
This Bracelet is made of Czech crystals beads, number beads, golden round beads and synthetic cord. The closure of the bracelet is macramé, adjustable to fit any size. Click below to watch the video tutorial.
Σε αυτό το βίντεο φτιάχνουμε βραχιόλι γούρι για να υποδεχτούμε με χαρά και τύχη το 2017! Χρησιμοποιούμε τους αριθμούς 1 και 7 αλλά μπορεί να φορεθεί και τα επόμενα χρόνια αλλάζοντας τους αριθμούς! Επίσης μπορούμε να το φτιάξουμε βάζοντας τους αριθμούς της ημέρας που έχει γενέθλια η φίλη μας και να κάνουμε ένα πρωτότυπο δώρο! Πατήστε στην εικόνα παρακάτω για να δείτε το βίντεο με αναλυτικές οδηγίες.
_______________
You will Need:
• 34 Czech Crystal Beads size -4mm
• 2 Gold Plated Number Beads (Number 1 and Number 7)
• 2 Round beads in golden color size-4mm
• 1 meter of black synthetic cord diameter-0.8mm
• Lighter, Tape, Tweezers, Scissors
This Video Tutorial explains how to make an elegant Evil Eye Crystal Bead Bracelet with leather cord and adjustable macramé closure. Choose your favorite color beads and personalize as you please.
Σε αυτό το βίντεο θα δείτε πως μπορείτε να φτιάξετε ένα Βραχιόλι σε σχήμα Μάτι με κρύσταλλα, δερμάτινο κορδόνι και κλείσιμο μακραμέ. Το βραχιόλι μάτι δείχνει πολύ ωραίο σε διάφορα χρώματα, διαλέξτε τις χάντρες που σας ταιριάζουν και ξεκινήστε!